Cara Reset Canon IP2770 Error 5B00

Resetter iP2770 ini dikirim oleh sahabat kita di Jambi, dan RESETTER IP 2770 ini sudah Kang Eko coba dan berjalan dengan sempurna. 100% working. Resetter ini bebas password... dan GRATIS


Cara Reset Canon IP2770 Error 5B00

Download Restter canon iP2770 v1074 bebas password di bawah ini :
DOWNLOAD RESETTER IP2770


Jangan lupa matikan download manager, agar downloadnya sukses...

Masuk ke Service Mode iP2770 :


1. Printer dalam keadaan mati dan kabel listrik terpasang.
2. Tekan tombol RESUME 2 detik
kemudian tekan tombol POWER sampai lampu hijau nyala (saat menekan tombol POWER, ...tombol RESUME jgn dilepas dulu)
3. Kemudian lepas tombol RESUME, tapi jangan lepas tombol POWER.
4. Sambil tombol POWER masih tertekan, tekan tombol RESUME 6 kali. Led akan menyala bergantian orange hijau dengan nyala terakhir hijau. (jangan sampai keliru 4x karena printer akan mati total, tapi sifatnya sementara juga) Kemudian ...
5. Lepaskan kedua tombol bersamaan.
6. Led akan blink sebentar kemudian akan nyala HIJAU.
7. Komputer akan mendeteksi device baru, abaikan saja .....
8. Keadaan ini menunjukkan printer iP2770 dalam keadaan SERVICE MODE dan siap direset.

Kemudian jalankan Resetter iP2770 v1074 nya:
1. Exctract File Resetter iP2770.
2. Siapkan 2 kertas di printer (ini untuk print pada waktu proses reset).
3. Jalankan program Resetter iP2770


4. Klik "MAIN", maka printer akan berproses, kemudian iP2770 akan print satu halaman dengan tulisan " D=000.0 "


5. Klik " EEPROM Clear ".
6. Kemudian klik " EEPROM ", dan printer akan print hasil Resetter iP2770. Salah satu barisnya tulisannya sbb:
"TPAGE(TTL=00000)"


7. Matikan Printer dengan menekan tombol POWER.
8. Selesai...

Jika setelah di reset iP2770 blink 16x, Silahkan baca solusinya di http://ekohasan.blogspot.com/2011/11/cara-service-canon-ip2770-blink-16x.html

Jika setelah di reset iP2770 blink 13x, Silahkan baca solusinya di http://ekohasan.blogspot.com/2010/11/cara-mengatasi-canon-ip2770-blink-13x.html

Untuk iP2770 dan MP258 error B200, klik di SINI

Selamat mencoba ... Semoga berhasil ..
Read More..

Holy Week Greetings!

Have a peaceful Holy Week to everyone...

From: the Moderators
Read More..

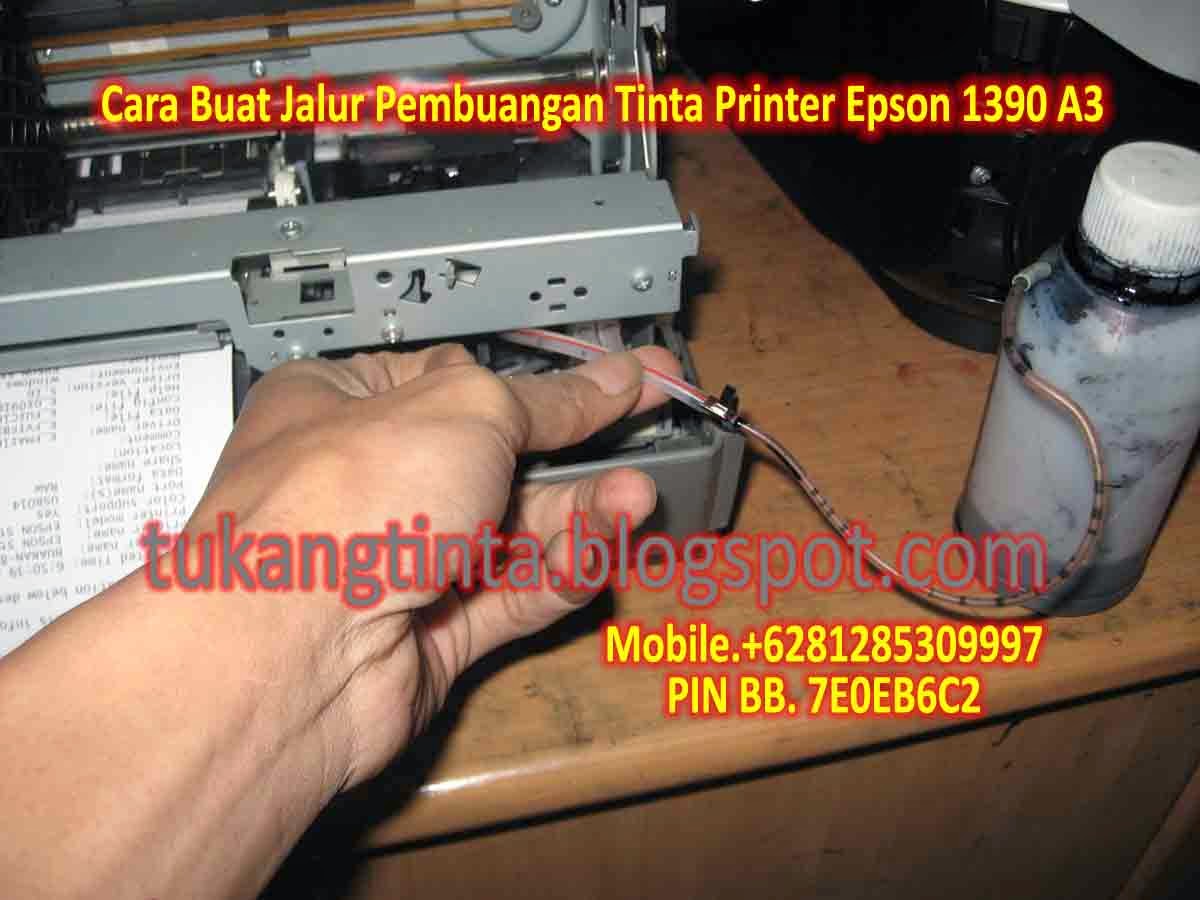
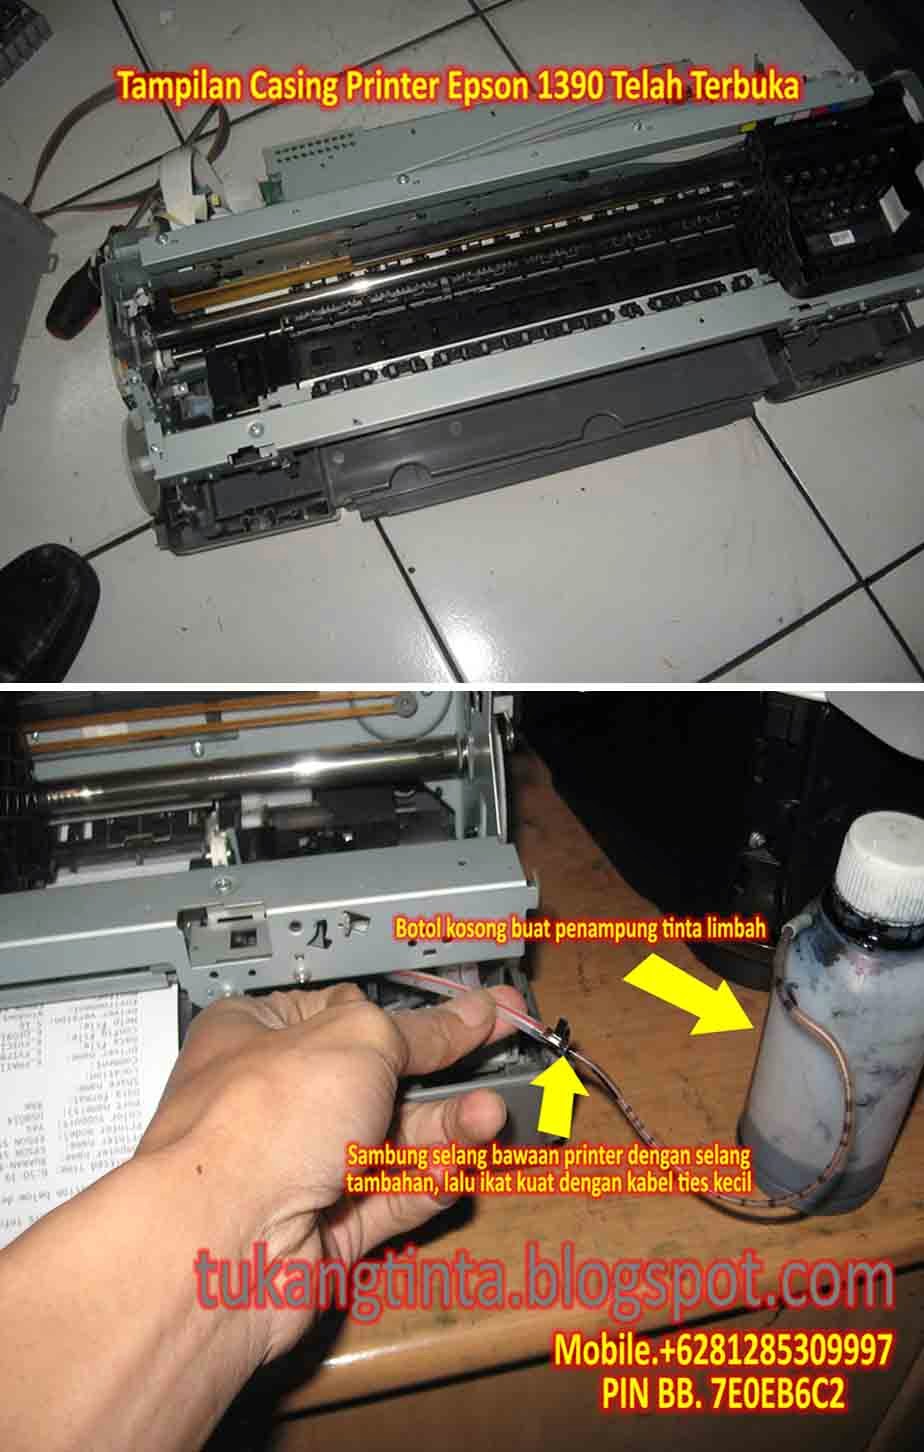
Cara Buat Jalur Pembuangan Tinta Printer Epson 1390 A3

http://tukangtinta.blogspot.com/
Hello Sobat, Kali ini Bang Mone dari TukangTinta.Com ingin membagikan pengalaman tentang " Cara Buat Jalur Pembuangan Tinta Printer Epson 1390 A3 ", perlu diketahui sobat dimana didalam mesin printer kita ada namanya bak atau busa penampungan tinta limbah dan penampungan tinta limbah akan penuh pada waktunya tergantung aktivitas pemakaian sobat. saat ini Bang Mone ingin berbagi bagaimana cara buat jalur pembuangan tinta limbah pada printer Epson 1390 A3, Langsung saja sobat lihat langkahnya dibawah ini :

Langkah Awal, siapkan peralatan yang dibutuhkan seperti :
  1. Obeng Plus.
  2. Obeng Min.
  3. Gunting.
  4. Selang Tambahan.
  5. Lakban Hitam.
  6. Botol Kosong.
  7. Kabel Tis Kecil.
  8. Bos Infus Uk.3.0 Inch atau Solder Listrik.
http://tukangtinta.blogspot.com/

Pertama buka casing printer sobat dahulu dengan benar, setelah casing printer terbuka, lalu kita cari selang pembuangan limbah bawaan printer kemudian sobat sambung dengan selang tambahan lalu ikat dengan kabel tis kecil, setelah selesai sobat lubangi bagian samping atau dibelakang casing printernya dengan Bor Infus Uk.3.0 Inch atau dengan Solder Listrik, setelah langkah akhir selesai sobat rakit dan pasang kembali casing printer seperti semula lalu tinggal pasang jalur selang yang telah dibuat dimasukkan dibotol kosong.


Selesai.


Sekian artikel Bang Mone dari TukangTinta.Com mengenai " Cara Buat Jalur Pembuangan Tinta Printer Epson 1390 A3 ", Semoga dapat bermanfaat, berguna dan menginspirasi sobat semua.

> Download Driver Printer Epson 1390 A3 klik disini

Salam,
Bang Mone dari TukangTinta.Com
www.tukangtinta.com
Mobile.+6281285309997
PIN BB 7E0EB6C2
Read More..

R290 Reseter

Hello everyone,

A lot of people are asking about this reseter. After searching for quite sometime here is a working copy provided by one of our members, manny_chengjr from Philippines. Thanks guys for all the support and please continue to help the group grow by sharing your knowledge and the reseters that you have.

Here is the link, in the meantime we uploaded it in divshare.

[JOIN OUR MAILING LIST TO GET DOWNLOAD INFO]

and mediafire :

[JOIN OUR MAILING LIST TO GET DOWNLOAD INFO]


By the way, CX5500 reseting procedure can be found in our files folder of the yahoo group.

Happy reseting everyone...

the moderators
Read More..

HP Deskjet 1050 All in One Printer – J410a Driver

HP Deskjet 1050 All-in-One Printer – J410a Driver and Software Download for Windows 7 – Windows Vista – Windows XP

Microsoft Windows 7 – Vista – WinXP
HP Deskjet Basic Drivers (32Bit)  DJ1050 J410 Basic x86 231
HP Deskjet Full Feature Software and Drivers (32bit-64bit) DJ1050 J410 231
ApplicationShop for HP Supplies Download
Utility – Diagnostic
HP Printer Install Wizard for Windows 7 Download
HP Print Diagnostic Utility Download
Mac Os
HP Deskjet Full Feature Software and Drivers – Mac OS X v10.5 and v10.6  Download


http://printerdrives.net
Read More..

More on Lexmarks Wireless X6570 All in One

I wrote my November 2007 column, from a mostly users perspective (see "Observations: Wi-Fi Printing -- Look Ma, No Cables"), exploring the emerging "standard" wireless interface on many of todays new printers. I used a Lexmark (NYSE LXK) Wireless X6570 All-in-One as my subject device, and found its printing capabilities to be more than satisfactory.

Since finishing the column, Ive continued to use the Lexmark AIO, and recently found a post "Berlinds Testbed" blog from ZDNets David Berlind on his experiences with the same all-in-one (see "HP, eat your heart out. At $150, Lexmark’s WiFi All-in-1 printer/copier/scanner/fax got my cash".) Davids post contains an interesting account of his purchase of the Lexmark product, including receiving surprisingly knowledgeable help from his local Staples store. And like me, he found the Wi-Fis biggest benefit to be location flexibility. (The basement-based Linux print server he replaced also rang true!)

Although I wasnt out to perform a full-scale review on the X6570, I still avoided reading other reviews before my own hands-on experiences with the products, in order to maintain my objectivity. After the fact though, its good to see someone elses similar experiences. This includes my post-column work with some of the products other functions, including successfully copying and scanning using the all-in-ones OCR capabilities. I recommend the Berlind post from earlier this month, including the up-to-now 24 comments, which (not surprisingly) run the gamut of pros and cons on everything from Wi-Fi itself to ink usage and color print quality.
Read More..

Blog Archive

Diberdayakan oleh Blogger.