Cara Menentukan Data Kaki Flyback

Berikut ini, kang EKo akan membahas tentang Cara Menentukan Data Kaki Flyback. Karena langkah ini sangat penting jika kita akan mengganti flyback monitor . OK mari kita belajar bersama......

Flyback adalah komponen monitor yg berfungsi untuk menghasilkan tegangan tinggi dan tegangan lainnya yg dibutuhkan monitor. Flyback sebenarnya adalah trafo tapi trafo untuk tegangan tinggi agar tabung bekerja mengeluarkan gambar.

Bagian-bagian flyback adalah sbb:
A. Bagian primer
B. Bagian sekunder
C. Bagian yg terpisah antara primer dan sekunder yaitu : ABL, Screen dan Fokus dan KOP flyback.


Bagian primer flyback antara lain:

1. colector : terhubung dg colector transistor horisontal. jika flyback kerja maka pin ini akan menghasilkan tegangan tinggi. Jangan di ukur dg multitester.

2. dioda dumper : terhubung dg dioda dumper. Tidak semua flyback memiliki kaki ini.

3. B+ : terhubung dg tegangan B+ 55v dan FET IRF630. Ini adalah kaki untuk tegangan kerja flyback. Jika teg B+ tdk masuk maka flyback tidak kerja dan monitor tidak nyala.

Jadi ketiga kaki ini jika diukur dengan ohm meter x1 terhubung.

Bagian sekunder flyback antara lain :

1. Gruond : terhubung dg ground monitor.

2. AFC : Automatic Frequency Control. tegangan 30-40 dcv Fungsinya untuk mengatur kerja IRF630, kalau tegangan terlalu tinggi, misal butuhnya 30 vdc dikasih 40 vdc maka IRF tidak bekerja, akibatnya tegangan B+ akan tetap 55v dan gambar monitor akan sempit kanan kirinya. Kalau IRF kerja, maka tegangan 55v akan menjadi tegangan 90-125v tergantung resolusi monitornya.

3. G1 : terhubung dg dioda dg posisi terbalik sehingga keluarannya adalah tegangan minus antara - 100-175 dcv. Dan setelah dioda akan ada elco regulator yg juga terbalik, jadi kaki positif dapat ground monitor dan kaki negatif dapat katoda dioda terbalik itu.

Bagian ABL

ABL : Automatic Brightness Limiter. tegangan tak terukur. Pin ini harus terhubung ke jalurnya jika tidak maka akan keluar percikan/ loncatan api listrik. Fungsinya untuk membatasi brightness yg menuju ke blok RGB secara otomatis.

Bagian Screen (G2):
Adalah bagian yg berfungsi untuk mengatur terang gelap gambar.

Bagian Fokus (G3/G4):
Adalah bagian yg berfungsi untuk mengatur fokus gambar (kabur tidaknya gambar)

Bagian KOP FLyback :
Adalah bagian yg menghasilkan tegangan tinggi 26kV yang menuju atas tabung.

OK, demikian penjelasan singkat tentang flyback.....

Oya ... tidak semua kaki flyback dipakai. Yang harus terpasang dan wajib dipasang adalah kaki :
Colector, B+, G1, Ground, AFC, ABL dan Ground kaki di samping flyback.

Dan urutan kaki flyback tiap type pasti berbeda jadi kalau mengganti flyback tidak asal langsung pasang kecuali typenya sama persis....

InsyaAllah bahasan mendatang adalah tentang Cara Mengganti / Membandrek Flyback dengan flyback lain type....

Selamat Belajar ....
Read More..

Cara Reset Canon Pixma iP1000

Mungkin resetter pixma iP1000 ini sudah kadaluwarso, tapi barangkali ada yang masih membutuhkan. Jadi saya tetep coba untuk posting artikel reset canon iP1000 ini. OK Lanjuut....

Printer canon iP1000 perlu direset bila terjadi :
Green orange berkedip bergantian

Berikut langkah-langkah Reset iP1000 :

1. Driver harus sudah di install. Jika belum punya drivernya klik disini.
2. Printer harus dalam keadaan service mode (temporary reset) .

Untuk mengaktifkan service mode:

* Cabut kabel power listrik
* Tekan power (di printer)
* Colokan power listrik (lampu akan berwarna hijau)
* Sambil menekan power tekan tombol resume (lampu berubah orange)
* Lepas keduanya (printer akan mati)
* Tekan tombol power lagi dan langsung lepaskan.(lampu akan berwarna hijau) (jangan mencabut power listrik)

3. Jalankan Resetter iP1000 dengan dobel klik screen.exe Jika belum punya, download di sini.
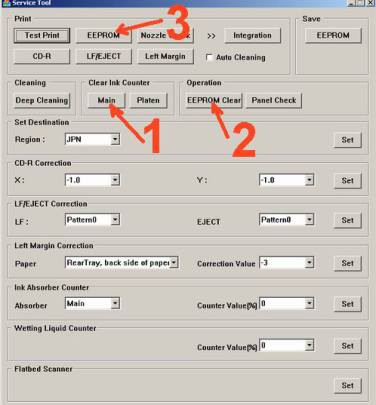
4. Ikuti gambar berikut ini .....


5. Cabut power listrik, colokan kembali dan nyalakan (printer initial/tunggu sampai lampu tdk berkedip. Selesai. Mudah khan...................
Read More..

Service tool pixma ip2770 Resetter Pixma iP2270


steps reset canon pixma iP22700: 
 - Log on to the service mode first connect the printer to the computer and the power cord without turning
  on the printer (the printer is turned off). 
- Press the Resume button about 2 seconds and then press the POWER button until the green light on 
   (when pressing the POWER button, Resume button jgn removed) 
- Then off the RESUME button, but do not release the button POWER
-  While the POWER button still depressed, press the Resume button 5 times. Led will light turns green to
   orange last flame orange. (not to be mistaken 4x because the printer will die in total which means that the 
   steps we have to reinstall from scratch)
- Then release both buttons simultaneously, the LED will blink briefly then will flash GREEN.
- At this time the computer will detect a new device, just ignore it and wait until the process is complete.
- This situation shows the iP2770 printer is in a state of SERVICE MODE and ready to reset

for permanent service
  
1. Download Resetter
2. Exctract File Resetter iP2770. 
2. Service Tool ServiceTool_V1050


3. Click the "MAIN", then the printer will proceed, then iP2770 will print one page
    with the words "D = 000.0
4. Click "EEPROM Clear".
5. Then click "EEPROM", and the printer will print the results iP2770 Resetter. One line in his writings as 
    follows: "TPage (TTL = 00000)" 
5.  Turn off the printer by pressing the POWER button.
6. Up here if all goes well, its too printer will reset and is back Normal.
Read More..

Canon pixma mp750 error 357


Any idea how to fix it? The symptoms, besides displaying error #357, are:
- print head does not move when I open or close the front panels(needed when
replacing ink cartridges)
- Message "Check printer. Press OK"
- Alarm indicator flashes
Read More..

Canon PIXMA MP600

Read More..

Canon Pixma iP4200 manual


From the Canon Pixma iP4200 manual, downloaded

pages 28-29:

1) With the printer power turned off, while pressing the Resume/Cancel button, press and hold the Power button. (DO NOT release the buttons. The Power LED lights in green to indicate that a function is selectable.)
2) While holding the Power button, release the Resume/Cancel button. (DO NOT release the Power button.)
3) While holding the Power button, press the Resume/Cancel button 2 times, and then release both the Power and Resume/Cancel buttons. (Each time the Resume/Cancel button is pressed, the Alarm and Power LEDs light
alternately, Alarm in orange and Power in green, starting with Alarm LED.)
4) When the Power LED lights in green, press the Resume/Cancel button the specified number of time(s) according to the function listed in the table below. (Each time the Resume/Cancel button is pressed, the Alarm and
Power LEDs light alternately, Alarm in orange and Power in green, starting with Alarm LED.) [hth: I believe the power button has to be pressed once more after cycling the alarm button to complete the action. The power/resume-cancel button LEDs toggle to help you count.]

Time(s) LED indication Function Remarks
0 times Green (Power) Power off When the print head is not installed, the
carriage returns and locks in the home position capped.
1 time Orange (Alarm) Service test print See 3-4. Verification Items, (1) Service test print.
2 times Green (Power) EEPROM information print
See 3-4. Verification Items, (2) EEPROM information print.
3 times Orange (Alarm) EEPROM initialization [hth: does not re-initialize Waste ink counter]
>>>> 4 times Green (Power) Waste ink counter resetting
5 times Orange (Alarm) Destination settings [hth: not applicable]
6 times Green (Power) Print head deep cleaning (Cleaning of both black and color)
[hth: 7-10 not applicable]
11 to 13 times Orange, Green, Orange (Alarm, Power, Alarm) Return to the menu selection
14 not used in servicing
15 Orange (alarm) return to the menu selection,.

Note: If the Resume/Cancel button is pressed 16 or more times, the Alarm or Power LED lights steadily without
any changes.

[hth: if the alarm light is flashing 15 times at turn-on [cartridge not recognized error], none of these procedures seem to work. If anyone knows how to defeat this error, I would like to know.]
Read More..

Blog Archive

Diberdayakan oleh Blogger.